Freestyle Body Position and Rotation
In This Article
The quickest way to swim faster is to improve your efficiency, and the best way to do that is to ensure you’re swimming with a proper body position and with proper body rotation.
In this section of our freestyle guide, we show you how to swim properly and we provide drills, sets, and dryland exercises that’ll help you swim more efficiently and powerfully.


This is the detailed page on freestyle body position. You can find the other three parts of the stroke broken down in detail below.
Maintaining a great body position is the most important skill for swimming freestyle fast. Your goal is to move through the water like a torpedo. Doing so greatly reduces the amount of energy it takes to go forward, which leads to more speed and endurance.
Many new swimmers struggle with body position because it’s such a new skill. Having a poor body position often means that their arms and legs must work hard to create stability in the water instead of just kicking and pulling, further hurting their speed.
Several muscle groups help you maintain a great body position. Your abdominals and obliques are key for keeping your spine in line. In addition, it’s important for you to “lean forward” in the water to establish a great body position, an action aided by your abdominals and obliques. Your lower back and hips are key for creating tension in the back of your body. This tension holds your legs up at the surface of the water, preventing them from sinking.
Rotation is critical for effective freestyle because it allows your arms to function optimally. Your shoulder doesn’t have the mobility to perform freestyle with a flat body position in the water. To recover your arms over the water, your body must rotate. Likewise, rotation places your arms in a more effective position to pull. For both reasons, you must rotate sufficiently and at the right time.
Rotation only works if you keep your spine relatively straight. Your whole spine needs to rotate in the same way at the same time for your rotation to fulfill its function.
Want to Improve Your Swimming?
Input your email below to get great swimming articles, videos, and tips sent to you monthly. (USMS members already get it)
Thanks! We just sent you your first email and will you should receive at least one monthly.
Establishing Comfort in the Water
One of the fundamental skills in swimming effective freestyle is also one of the most overlooked. Being comfortable and relaxed in the water is the foundation of all swimming success, yet many swimmers never spend any time working to improve it.
Imagine how much you would struggle if you had weights tied to your hips. All your effort would be devoted to staying afloat. Now imagine you’re paddling on a surfboard. None of your effort would be devoted to staying afloat, and you could focus on creating propulsion with your arms.
These extremes are just to illustrate the concept, but many swimmers would be surprised to learn that their swimming experience is often closer to the former example, and it doesn’t have to be that way.
All swimmers can float thanks to the buoyancy created by the air in their lungs. Your lungs can and will hold you up at the surface of the water if provided the opportunity to do so. Many swimmers struggle to find that sense of flotation, however. If you don’t have a solid sense of comfort and stability generated from your lungs, everything you do with your arms and legs will be focused on creating that necessary stability. If your arms and legs are focused on creating stability, they won’t be able to do their primary job: creating propulsion.
The buoyancy of your lungs also helps you establish optimal alignment in the water. For these reasons, learning to feel the support of your lungs is one of the first steps you should take when improving your freestyle.
This is a skill that must be felt because it can’t easily be explained. Fortunately, there are exercises to help you experience the buoyancy of your lungs. The activities may seem simple, yet they create the foundation for establishing the optimal body position necessary to swim fast.

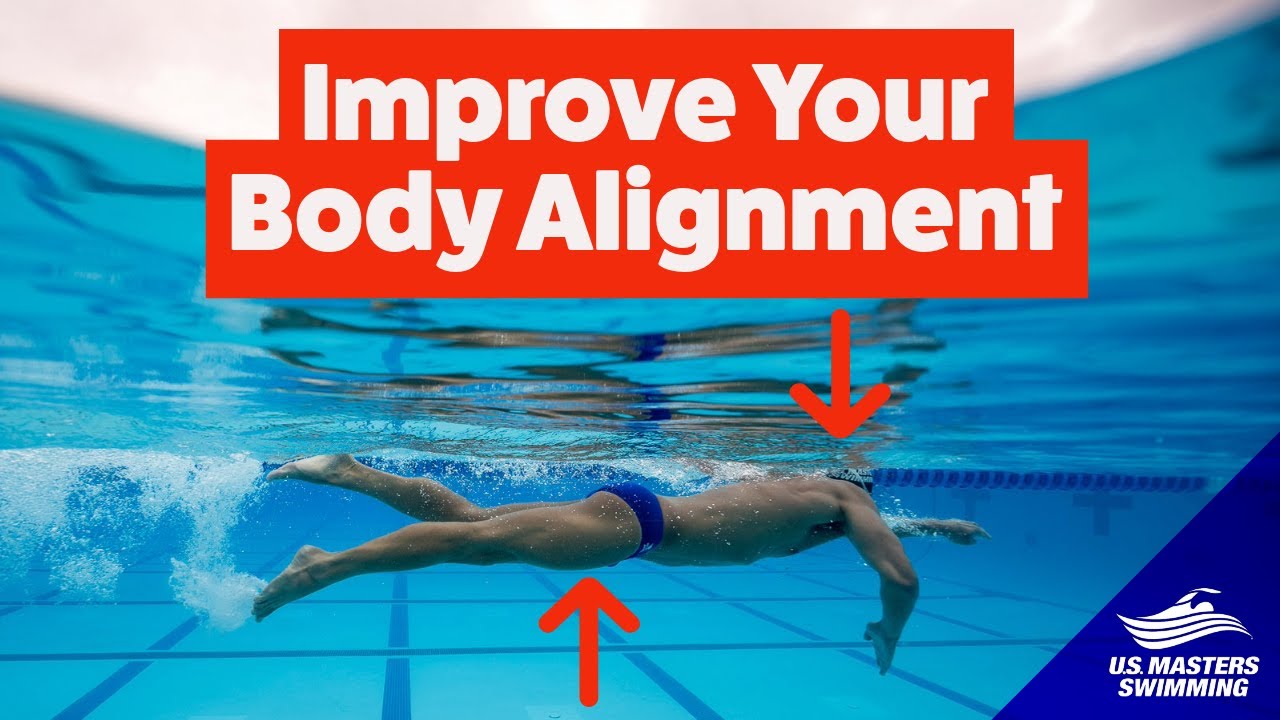
Strategies for Improving Your Body Alignment
To move through the water with speed and ease, your body needs to be in alignment. Everything needs to be as straight as possible from head to toe, minimizing any drag. You need to learn how to use your lungs to create the torpedo-like alignment you want to establish so that you can swim quickly and easily.
Think of your body as a seesaw, with your lungs functioning as the fulcrum, holding you up in the water. Your lungs aren’t positioned in the center of your body, however. So, when you’re lying flat in the water, there’s a lot more mass (your hips and legs) on one end of the seesaw than the other. That end of the seesaw is going to drop down. To get your body in line, you must work to elevate your legs, working against the imbalance in the seesaw.
The first strategy is to press your head and chest, the lighter end of the seesaw, down into the water. By leaning into the water and leaning into your lungs, you’ll put pressure into the flotation you feel in your chest. This active strategy can work to reduce the imbalance, lifting your legs in the process.
Some swimmers can use this strategy and it works perfectly and they achieve great alignment. Others aren’t so lucky. Some swimmers also need to think about creating tension in their lower back and legs to lift their hips and legs. If the first strategy was to push one end of the seesaw down, this second strategy is to lift your other end up.
How to Find the Right Alignment in the Water
All swimmers are different. They have bones of different length, shape, and density. They have different quantities and distribution of muscle and fat throughout their body. They even have different-size lungs, and their lungs may be of varying distance from the center of mass of their body. All these factors combine to influence how a given swimmer will naturally settle in the water. As a result, what it takes to achieve optimal alignment in the water will differ from person to person.
Both pressing down with your chest and creating tension in the back of your body are strategies that work. Some swimmers might only need to focus on one strategy or the other. Others might need to use both strategies. For some, only a subtle shift in focus is required for change, whereas others need to emphasize these strategies to achieve an effective position.
Ultimately, finding your best body position is an experiment. The exercises provided below provide the tools for conducting that experiment. Those tools will help you understand how to improve your body position. Then it’s a matter of practicing while paying attention to the outcomes you achieve. If you find your swimming to be easier, it’s a more effective position. If you’re able to swim faster, it’s a more effective position. If you’re able to take fewer strokes, it’s a more effective position.

The Role of Rotation
Coaches have many reasons why they believe rotation is important in freestyle. Some believe that it reduces the drag created during the stroke, whereas others believe that it harnesses core strength to help create propulsion. Both ideas have merit, but ultimately, the true role of rotation is simple: It creates extra range of motion for your shoulders.
Your shoulder is a truly amazing joint. It can move through a tremendously varied range of motion, and it can do so with amazing speed and strength. When it comes to swimming freestyle, however, your shoulder reaches its limitations. Despite being incredibly mobile, your shoulder simply can’t meet the strength and mobility demands of freestyle when it is swum flat, or without body rotation. Your arms just can’t get into the appropriate positions. You need more range of motion through your shoulder.
To recover effectively, your arm needs to move back and then stay above you as it moves forward overhead. Your shoulders can’t accommodate that range of motion. Stand up and give it a try without allowing your torso to move. It’s very difficult, if not impossible.
Now perform the same movement with progressively more rotation, and you’ll find that the impossible quickly becomes possible. This illustrates how important rotation is for allowing the necessary range of motion to smoothly recover your arms.
Your pull also improves with a better recovery. The repositioning of your arm during your catch requires a lot of range of motion to execute effectively. By rotating toward your pulling arm during your catch, you increase your range of motion and therefore your efficiency and power. The rotation also allows for your arm to be in a better position to create propulsion for a longer period. This effect isn’t possible given the limitations of your shoulder if you don’t rotate while you’re swimming, but it becomes possible with the range of motion created by rotation.

Where Should Rotation Come From?
There are many competing ideas about where body rotation should come from. Should it come from your hips, shoulders, or some combination of the two?
Those who believe more rotation results in less drag believe your hips should lead the rotation to ensure your body gets on its side. Those who believe the rotation allows you to use your core often believe rotation should occur as a unit.
The role of rotation is to allow for extra range of motion in your shoulders, so your shoulders should lead the rotation. They determine when rotation happens and how much rotation occurs, both of which are determined by how much range of motion your arms need to move through. Your shoulders are the primary source of rotation during freestyle.
That’s not to say that your hips don’t or shouldn’t move. They do and they should. They move because of what your shoulders do, however. Just as there is a limit in the range of motion of your shoulders, there is a limit in the range of motion of your spine. It can only rotate so much.
If you need more range of motion, your hips must move as well, just enough to get the necessary motion. Because your spine is relatively stiff, it doesn’t move quite as much at slow speeds because the momentum of your arms isn’t great enough to overcome that stiffness. As a result, your hips move more to create the necessary range of motion when you swim slowly.
When you swim faster and approach sprint speed, your hip rotation tends to get smaller and smaller, but the rotation of your shoulders remains similar. This is because you need more range of motion in your shoulders. And because your arms are moving much faster and with much greater force, the extra momentum of your arms tends to force more range of motion through your spine, allowing your shoulders to move more without your hips moving as much.

Achieving Optimal Rotation
Although increasing your body rotation can improve your arm recovery and pull, too much rotation is problematic. Increased rotation won’t necessarily negatively affect your arm recovery, but it will negatively affect your ability to pull effectively. Past a certain point, rotation will drive your elbow deeper in the water, making it nearly impossible to achieve a proper catch. If you can’t get your catch, it becomes extremely difficult to execute a great pull.
Also, more rotation takes more time. Each stroke will take longer to complete without increasing the amount of propulsion or decreasing the amount of drag. As a result, taking more time for each stroke will slow you down. In this sense, more rotation doesn’t negatively affect your technique, but it does negatively affect your speed because you’re taking longer between strokes, which provide propulsion.
Because the biggest benefit of rotation comes from smoothly recovering your arms over the surface, this should be your gauge for the appropriate amount of rotation. If you’re unable to recover your arms smoothly over the surface, you need to rotate more. Once you can rotate your arms smoothly over the surface, that amount of rotation is sufficient and more would be counterproductive.
Rotational timing is also important. Rotation can benefit both your arm recovery and your pull, which happen at the same time on opposite sides of your body. To ensure that both your recovery and pull benefit from the added rotation, your timing needs to be precise.
The general concept is that your arms are moving in opposition, and your rotation is following suit from side to side. Appropriate timing is difficult to describe and must be experienced to be understood. There are, however, exercises that make feeling this timing possible.
- All of the articles were written by Andrew Sheaff

Want to Improve Your Swimming?
Input your email below to get great swimming articles, videos, and tips sent to you monthly. (USMS members already get it)
Thanks! We just sent you your first email and will you should receive at least one monthly.
Drills
Ball Float
The ball float is the foundational drill for establishing proper body position. It helps you feel how your lungs hold you up on the surface of the water. You’ll discover that you can float without any effort while performing this drill.
Different swimmers will achieve different positions while performing ball float, which isn’t a problem. What’s important is the feeling of support that your lungs create, as well as remaining near the surface without effort.
To perform this drill, take as big a breath as possible, then pull your knees to your chest and hug your knees, like a ball. Patiently wait until you settle in the water. You may settle immediately at the surface or you may sink and then rise back up. Feel the support of your lungs.

Basketball Bounce
This exercise magnifies the sensations experienced during the ball float. As a partner pushes you down into the water, the sensation of your lungs pushing back up increases. Then when you accelerate back to the surface, you can again feel how your lungs keep you up on the surface. Your body wants to float, and this exercise helps you really feel this. It will help you understand that floating is possible without effort.
To perform this drill, take as big a breath as possible, then pull your knees to your chest and hug your knees, like a ball float. Have a partner push you toward the bottom of the pool. Your partner should wait until you rise back up, then push you back down again.

Passive Jellyfish
During ball float and basketball bounce, you don’t need effort to maintain position. There was still some necessary tension, however, to maintain the ball position.
In passive jellyfish, let go of all tension and just let your body settle. The position you achieve doesn’t matter. The key is completely relaxing and remaining at the surface of the water, which reinforces the idea that you can float without effort.
To perform this drill, take as big a breath as possible, and then relax your entire body. Your legs and hips will almost certainly sink. Eventually, you’ll settle in the water, most likely with your upper back remaining at the surface. Feel the support of your lungs and how they hold you at the surface without any effort.

Active Jellyfish
Performing this drill after the first three begins the process of learning to change your position in the water, using your lungs as a leverage point.
Your goal was to relax during passive jellyfish. For active jellyfish, your goal is to actively attempt to maintain a horizontal position in the water. This is achieved by pressing your head and chest down into the water, working against the buoyancy of your lungs, which, in turn, elevates your hips.
To perform this drill, take as big a breath as possible, then let your legs hang. Press your chest and head down into the water in an attempt to keep your hips at the surface of the water. You may need to perform very light kicking or sculling to assist. Attempt to keep your torso level in the water with as little effort as possible.

Letter Floats
Letter floats help you learn how to create tension in your lower back and the back of your legs to hold your legs closer to the surface. Depending on your body structure, it may be difficult to hold your legs at the surface.
Rather than focusing on the end position, your goal during letter floats is to learn to minimize how much your legs drop. The ability to minimize leg dropping will allow for a much better body position while swimming.
To perform this drill, take as big a breath as possible, then aim to recreate different letters at the surface of the water. With your arms and legs, you can make an X, Y, T, or I. To do so, you’ll need to lean into the water with your head and chest, as well as learn to create tension in your legs to hold the position. Focus on getting your legs as high as possible for you, which may or may not be at the surface of the water. Improving your body position, rather than your final body position, is what’s important.`

Ball Float to Letter Float
Ball float to letter float combines two skills: learning to feel the support of your lungs and then maintaining that support while learning to lift your legs. This combination is key to achieving a great body position.
This drill also requires movement. You’re moving back and forth between two positions, aiming to maintain position, control, and stability throughout. Swimming itself is an active process of maintaining position.
To perform this drill, take as big a breath as possible, then pull your knees to your chest and hug your knees, like a ball. From that position, transition by moving your arms and legs into the shape of an X, Y, T, or I. Move back and forth between the ball float and the letter positions. To do so, you’ll need to lean into the water with your head and chest, as well as learn to create tension in your legs to hold the position. Focus on getting your legs as high as possible for you, which may or may not be at the surface of the water. Improving your body position, rather than your final body position, is what’s important.

Want to Improve Your Swimming?
Input your email below to get great swimming articles, videos, and tips sent to you monthly. (USMS members already get it)
Thanks! We just sent you your first email and will you should receive at least one monthly.
Elevator Swim
Elevator swim helps transfer what you learned during floating exercises into freestyle. The goal is to learn how the position of your head and chest, and the pressure they create in the water, influence the position of your hips and legs. The exercise can be done with your head starting high and ending low, or the reverse. The goal is to discover which position allows for the easiest and fastest freestyle.
To perform this drill, begin swimming freestyle with your head as high in the water as possible. Over the course of the length, gradually lower your head as low as possible, pushing it well under the surface of the water. This can be performed in reverse, starting low and ending high. You can move from high to low over shorter distances than the length of a pool, and you can perform multiple elevator swims over a single length.

Straight-Arm, Breath-Every-Stroke Freestyle
Straight-arm, breath-every-stroke freestyle focuses on learning to exaggerate the magnitude of your rotation. For swimmers who swim flat in the water, often with low arm recoveries, this drill can encourage more rotation. Breathing tends to lead to more rotation and very high straight-arm recoveries will do the same.
Your goal is to feel a tremendous amount of side-to-side rotation, exaggerating the rotation of your shoulders and hips.
To perform this drill, swim with completely straight-arm recoveries while breathing every stroke. Move as patiently as possible and exaggerate your rotation, looking up to the sky/ceiling while breathing.

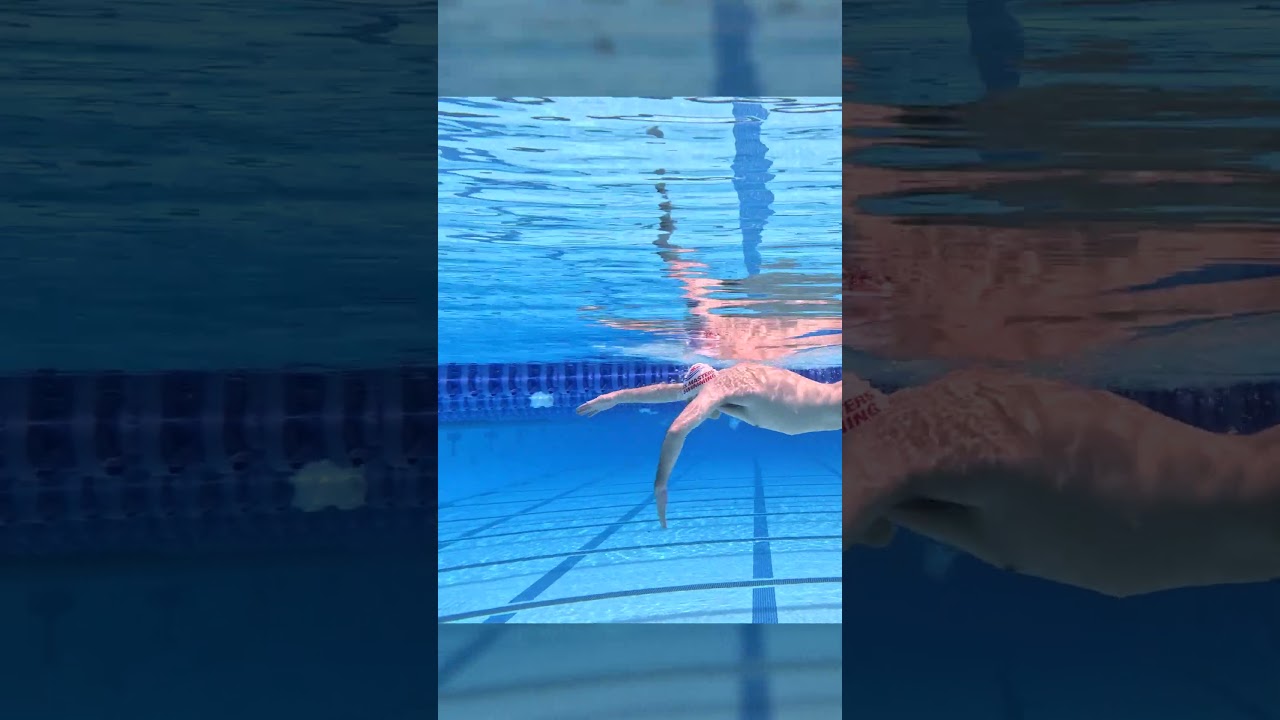
Underwater Recovery
Underwater recovery simplifies freestyle to encourage effective rotation of your shoulders and, more important, effective timing of the rotation of your shoulders. When recovering your arm forward, you must rotate to overcome the resistance of the water because your hand is underwater. The only way to create that rotation is to simultaneously pull your opposite arm backward.
In this way, your arms are linked in opposition through the rotation, which is needed for rotational timing in freestyle. Your focus should be on recovering both arms directly forward and pulling directly back.
To perform this drill, lie flat on the water with your arms stretched out in front of you. Rotate one arm down toward the bottom of the pool and then pull straight back. Upon completing the pull, recover your arm underwater and return to the start position. As that arm begins to recover, rotate your opposite arm down toward the bottom of the pool and then pull straight back. Your arms should be moving in opposition, just as in freestyle.

Over-Under Freestyle
Over-under freestyle builds upon underwater recovery by recovering one arm over the surface. This begins your transition to regular freestyle. However, because one arm is still underwater, it requires the same precise timing as underwater recovery.
Your focus should be on recovering both arms directly forward and pulling directly back. If transitioning from underwater recovery to regular freestyle proves too difficult, this drill can help manage this transition. This exercise can also be incorporated into longer swimming sets.
To perform this drill, lie flat on the water with your arms stretched out in front of you. From that position, rotate one arm down toward the bottom of the pool and then pull straight back. Upon completing your pull, recover your arm underwater and return to the start position. As this arm begins to recover, rotate your opposite arm down toward the bottom of the pool and then pull straight back. Your second arm will recover over the water. Your arms should be moving in opposition, just as in freestyle.
- All of the drills were written by Andrew Sheaff
Want to Improve Your Swimming?
Input your email below to get great swimming articles, videos, and tips sent to you monthly. (USMS members already get it)
Thanks! We just sent you your first email and will you should receive at least one monthly.
Sets
Set 1
(6 times through)
Take 10–15 seconds rest between repetitions
- Rounds 1 and 4: Cruise all swims
- Rounds 2 and 5: Count strokes on all swims
- Rounds 3 and 6: Build speed on all swims
- 10 seconds of ball float and then a 25 freestyle
- 10 seconds of passive jellyfish and then a 25 freestyle
- 10 seconds of active jellyfish and then a 25 freestyle
- 10 seconds of X-float and then a 25 freestyle
- 50 freestyle
Purpose and Focus Points
The purpose of this set is to begin the process of establishing proper body position. Each drill focuses on a different aspect of good body position. Focus on learning to manage your body position during the drills, then swim with that same intention while performing freestyle.
Rather than practicing the same drill repeatedly, constantly rotate. Although this may compromise your performance in the short term, it increases it in the long term because you’ll be working toward getting your body position ideal.
Requiring stroke counts and speed changes during some of the rounds increases the challenge and provides some variability. This places an added demand on achieving a great body position, which will increase your learning.

Set 2
(4 times through)
Take 10–15 seconds rest between repetitions
- Round 1: Ball float
- Round 2: Active jellyfish
- Round 3: X float
- Round 4: No floating
- 100 freestyle, cruise effort; perform 10-second float before each 25
- 10-second float and then 25 freestyle, steady effort
- 10-second float and then 50 freestyle, solid effort
- 10-second float and then 75 freestyle, strong effort
Then
- 4 x 125s freestyle, descend 1–4; perform 10-second choice float prior to each; 15–20 seconds rest between repetitions
Purpose and Focus Points
The two parts of this set focus on increasing the duration that you can maintain a proper body position while also increasing your effort. It’s not enough to be able to execute good body position over short distances at slow speeds.
It’s important to keep consistent reminders of how to execute good body position to ensure that you maintain these skills. That’s why they’re included between repetitions.
The goal is to work on the skills of good body position in between swims, then actively work to maintain those positions while swimming.
It’s OK if it’s difficult to maintain a great body position throughout, provided you put forth an earnest attempt to re-establish it between each repetition.

Set 3
Take 10–15 seconds rest between repetitions
- 100 as 25 straight-arm, breath-every-stroke freestyle/25 underwater recovery, cruise effort
- 100 as 25 underwater recovery/25 over-under freestyle, cruise effort
- 100 as 25 over-under freestyle/25 freestyle, cruise effort
4 x
- 25 straight-arm, breath-every-stroke freestyle
- 75 freestyle, descend 1–4 to solid effort
- 100 as 25 straight-arm, breath-every-stroke freestyle/25 underwater recovery/50 freestyle, steady effort
- 100 as 25 underwater recovery/25 over-under freestyle/50 freestyle, steady effort
- 100 as 25 over-under freestyle/75 freestyle, steady effort
4 x
- 25 underwater recovery
- 75 freestyle, descend 1–4 to strong effort
- 100 as 25 straight-arm, breath-every-stroke freestyle/25 underwater recovery/50 freestyle, solid effort
- 100 as 25 underwater recovery/25 over-under freestyle/50 freestyle, solid effort
- 100 as 25 over-under freestyle/75 freestyle, solid effort
4 x
- 25 over-under freestyle
- 75 freestyle, descend 1–4 to stronger effort
Purpose and Focus Points
The purpose of this set is to increase how much you rotate and improve the timing of your rotation.
These drills are assigned in a specific order for a specific reason. The first step is to use straight-arm, breath-every-stroke freestyle to improve the amount of rotation that occurs each stroke. Next, use underwater recovery to enhance the timing of your rotation. Last, use over-under freestyle to help transition these skills to regular freestyle.
To add technical and physical challenge, this set requires you to swim progressively faster throughout. Because the nuances of timing tend to change slightly with changes in speed, you’ll face situations in which you must learn to execute good timing across a variety of speeds.

Set 4
Take 20–40 seconds rest between repetitions
- 100 freestyle, perform 10 seconds of active jellyfish before each 25, swim each 25 faster than the one before
- 2 x 25s elevator swim, perform 10 seconds of ball float before each one
- 4 x 12½s fast, perform 10 seconds of active jellyfish before each one
- 50 freestyle recovery, perform 10 seconds of ball float before each one
- 100 freestyle, perform 10 seconds of X float before each 25, swim each 25 faster than the one before
- 2 x 25s elevator swim, perform 10 seconds of ball float before each one
- 4 x 25s fast, perform 10 seconds of X float before each one
- 50 freestyle recovery, perform 10 seconds of ball float before each one
- 100 freestyle, perform 10 seconds of active jellyfish before each 25, swim each 25 faster than the one before
- 2 x 25s elevator swim, perform 10 seconds of ball float before each one
- 4 x 37½s fast, perform 10 seconds of active jellyfish before each one
- 50 freestyle recovery, perform 10 seconds of ball float before each one
- 100 freestyle, perform 10 seconds of X float before each 25, swim each 25 faster than the one before
- 2 x 25s elevator swim, perform 10 seconds of ball float before each one
- 4 x 50s fast, perform 10 seconds of X float before each one
- 50 freestyle recovery, perform 10 seconds of ball float before each one
Purpose and Focus Points
The purpose of this set is to learn how to maintain an effective body position during high-intensity swimming. This set includes a lot of faster swimming interspersed with body position drills. Your goal is to swim as fast as possible while maintaining a good body position.
The drills serve as constant and consistent reminders of how to achieve a great body position. Internalize those sensations and then aim to recreate them when going fast.
By constantly rehearsing and reinforcing a great body position, these skills will begin to become second nature. It's important to practice them while swimming fast because these skills must be executed at a high speed in races.

Set 5
Take 20–30 seconds rest between repetitions
- 100 (25 underwater recovery/50 over-under freestyle/25 freestyle), cruise effort
- 4 x 25s underwater recovery, build to fast
- 4 x 50s freestyle, descend 1–4 to fast
- 100 (25 underwater recovery/50 over-under freestyle/25 freestyle), cruise effort
- 4 x 25s over-under freestyle, build to fast
- 4 x 50s freestyle, descend 1–4 to fast
- 100 (25 underwater recovery/50 over-under freestyle/25 freestyle), cruise effort
- 4 x 25s underwater recovery, descend 1–4
- 4 x 50s freestyle, build to fast, descend 1–4
- 100 (25 underwater recovery/50 over-under freestyle/25 freestyle), cruise effort
- 4 x 25s over-under freestyle, descend 1–4
- 4 x 50s freestyle, build to fast, 1–4
Purpose and Focus Points
In contrast to the previous set focused on improving rotational skill, this set focuses on speed rather than endurance. The goal is to learn how to execute these skills at speed.
Use the same skill progression as before. Focus on establishing more body rotation with straight-arm, breathe-every-stroke freestyle, learning better rotational timing with underwater recovery, and transitioning properly to freestyle swimming with over-under freestyle.
This set includes both descending and building efforts, both with the drills themselves and with freestyle. Not only does this allow you to learn how to rotate effectively at higher speeds, it allows you to feel how the timing changes at different speeds and how to manipulate the timing to achieve speed.
- All of the sets were written by Andrew Sheaff

Want to Improve Your Swimming?
Input your email below to get great swimming articles, videos, and tips sent to you monthly. (USMS members already get it)
Thanks! We just sent you your first email and will you should receive at least one monthly.
Dryland Exercises
Alternating Superman
Alternating Superman improves your ability to create tension on the back of your body while also developing strength and endurance to maintain these skills.
Because your legs will be kicking in an alternating manner while swimming, holding your legs up while swimming is more difficult than simply squeezing and holding. By alternating your legs while performing this exercise, it’s a step closer to how your legs will function while swimming.
To perform this exercise, lie flat on the ground on your stomach. Your legs should be straight, and your arms should be straight in front of your body. Squeeze the muscles of your back and hips and lift one arm and the opposite leg off the ground. Hold briefly, then return to the ground under control. Repeat with the other arm and leg. Your head and chest should come off the ground slightly during each repetition.

Reverse Hyperextension
Reverse hyperextension builds upon Superman and alternating Superman. It serves the same basic function as those two exercises but with two distinct differences. The reverse hyperextension uses a much larger range of motion than those two exercises.
If your legs are low in the water, improving range of motion may be more relevant. Furthermore, this exercise can be loaded with external resistance to build strength.
To perform this exercise, lie face down on a bench or hyper-extension machine with your legs hanging freely off the bench or machine. Ensure that you have something to hold onto with your hands. Squeeze the muscles on the back side of your body to lift your legs up so that they are parallel to the ground. Pause briefly at the top of the repetition, then lower under control. Try to keep your upper body still and use as little momentum as possible to lift your legs.

Back Extension
Back extension continues to develop the back of your body while also helping you learn how to use tension in your back and legs to lift your legs in the water.
This exercise is great for challenging your hip and back muscles over a larger range of motion and with higher levels of resistance. It also differs from the previous exercises because your upper body is moving while your legs remain stationary. This adds a twist to the same theme of skill and strength.
To perform this exercise, use a back extension device. Adjust the foot placement so that your hips are slightly in front of the pad. Secure your legs into the back of the foot placement. Lower your upper body under control until it’s vertical. Then squeeze the muscles on the back side of your body to lift your upper body until it is parallel to the ground. Pause briefly. Return to the bottom position under control.

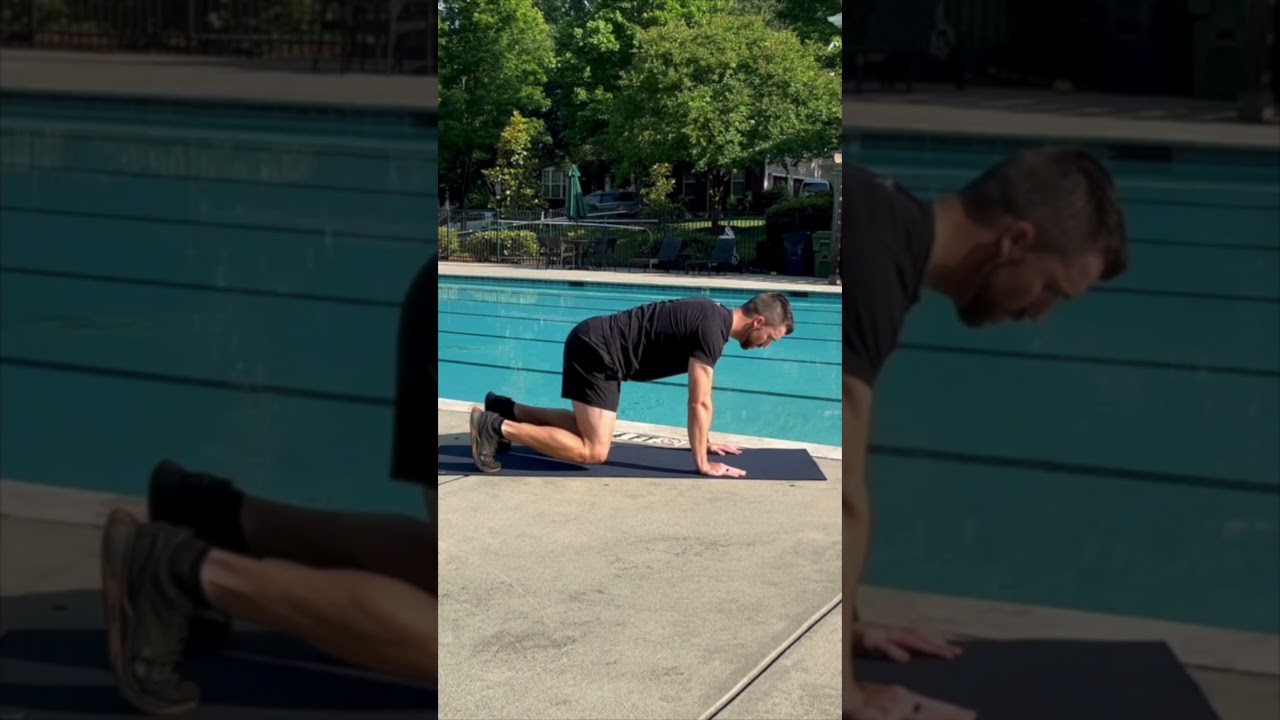
Bear Plank
Great alignment and position start with ensuring your spine stays straight. Bear plank is an excellent exercise for developing the muscles that help keep your spine aligned.
This version of the plank is particularly effective because the bent-knee position minimizes the effectiveness of your hip flexors. As a result, your abdominal muscles must do most of the work, which is exactly the goal. Because of this benefit, as well as the increased challenge to shoulder stability, this version of the plank has major advantages.
To perform this exercise, get on your hands and knees, and then push into the ground with your hands and lift your knees slightly off the ground. Keep your knees as low as possible and keep your head up. Your hands should be directly underneath your shoulders and your knees should be directly underneath your hips.
Want to Improve Your Swimming?
Input your email below to get great swimming articles, videos, and tips sent to you monthly. (USMS members already get it)
Thanks! We just sent you your first email and will you should receive at least one monthly.
Dead Bug
Although maintaining a straight spine is important, maintaining a straight spine while simultaneously moving your arms and legs is more important. This exercise helps you perform that more important skill.
While performing the dead bug, move your arms and legs in a controlled fashion. The key is to maintain a flat back; avoid arching it while moving your arms and legs. Regardless of how much your arms and legs move, your spine should remain relatively stable. If your back is coming off the floor, reduce the range of motion of your legs and arms.
To perform this exercise, lie on your back with your knees bent and your arms pointing straight to the ceiling. Your knees should be right over your hips so that your upper leg is in a straight line pointing toward the ceiling. Lower one arm and the opposite leg so that they are straight, 1 to 2 inches off the floor. Pause briefly, then return to the starting position. Lower your other arm and leg the same way, then return to the starting position. Your spine should not move throughout; your lower back should remain in contact with the floor throughout.

Double-Leg Extension
Double-leg extension is like dead bug but with an added challenge.
Because both of your legs are extending at the same time, there’s a lot more weight that must be held off the floor. This makes it more difficult for your torso to remain straight and stable, and a much bigger challenge.
As with the dead bug, only extend your legs as far as you can while keeping your spine stable. Moving more than that won’t train the right skill.
To perform this exercise, lie on your back with your knees bent and your arms by your side. Your knees should be right over your hips with your thighs in a straight line pointing toward the ceiling. Lower both of your legs so that they are straight, 1 to 2 inches off the floor. Pause briefly, then return to the starting position. Your spine should not move throughout; your lower back should remain in contact with the floor throughout. Lower your legs as far as you can while keeping your spine straight.

Physioball Roll-Out
Physioball roll-out trains a similar skill as the dead bug and double-leg extension. The key difference is that it is performed on your stomach rather than your back. In addition, your arms are moving rather than your legs.
The same concept applies: Keep your spine from moving as your arms extend. Be sure to only extend your arms as far as you can maintain control of your spine. Go slow and stay in control.
To perform this exercise, begin on your knees with your hands resting on a physioball. Your body should be upright. Lean forward and roll the ball forward so that the ball travels up your arm. Your body will begin to lean forward until it is parallel with the ground. Pull back into the ball to return to the starting position. Throughout the exercise, aim to keep your spine straight, with your hips and shoulders in line.

Rolling Elbow Plank
While you’re swimming freestyle, you should aim to maintain a relatively stable spine while your body rotates in the water. Although there will be rotation in your spine while you swim, you should have little to no bending of your spine.
Rolling elbow plank allows you to practice that skill on land while also developing the muscles responsible for ensuring it happens in the water. The key is for your movement to be purely rotational, rather than a bend at your waist.
To perform this exercise, get into plank position. Your spine should be straight. Lift one arm and rotate your torso so that all your weight is resting on your other elbow, with your body in a straight line. Shift your weight back so that both of your elbows are on the ground. Then lift your other elbow off the ground, shifting your weight to the opposite elbow, with your body in a straight line. Return to the starting position.
- All of the dryland exercises written by Bo Hickey

Want to Improve Your Swimming?
Input your email below to get great swimming articles, videos, and tips sent to you monthly. (USMS members already get it)
Thanks! We just sent you your first email and will you should receive at least one monthly.
This is the detailed page on freestyle body position. You can find the other three parts of the stroke broken down in detail below.


