Teaching Masters to Master the Butterfly

A no-fail, step-by-step plan to learn butterfly!
Several years ago I was desperate to find a way to teach butterfly to adult swimmers … from scratch. I had a lot of adults who, over the years, had lost ankle flexibility, core strength and rhythm. There wasn’t much I could do about the first two except for dryland work whenever I could fit it in and ankle flexibility exercises. And rhythm … you either have it or you don’t. If you don’t, it’s a constant struggle to do fly well but you can get there. These swimmers had been hounding me to teach them, and I was getting more and more frustrated by the fact that I could not give them fly sets in workout.
I kept coming back to the possibility that I could teach them the same way I had taught my age groupers, but then always rejected the idea because of the silliness/simplicity of those drills. Eventually though, desperation gave way to having no other choice. The results astounded me.
I took them through a five-stage fly progression, which worked 100 percent and took less than six workouts. By the end, I had seven new butterfliers. This progression had developed when I was an age group coach more because it was fun and the kids thought they were getting a chance to goof around – a win for everyone in the age group world. Here it was again, with adults, and they loved it.
There are five stages, each with several steps included. For the first stage of the progression, you will need a part of the pool where the water is between 3.5 and 4 feet. No one may move to the next step until they have mastered the preceding step. The first day of every new fly progression is dedicated to these exercises. Every subsequent day during the progression period, the swimmers go through these exercises, in order.
Stage 1
Step 1
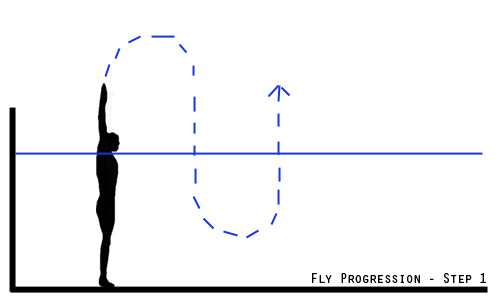
Standing in the water, arms in a streamline position over the head. Jump as high as possible, and in mid-air, bend and dive back in. We call it “jumping a rainbow.” The goal is to get as high as possible with the tightest arc possible. Once they enter the water, they can simply pop back up. Have the swimmers do this drill from the wall out to mid-pool, or as far as they can go and still jump and get the arc. It looks pretty simple but getting a tight arc is not simple. It can take 10, 15 or more times to get it.
Step 2
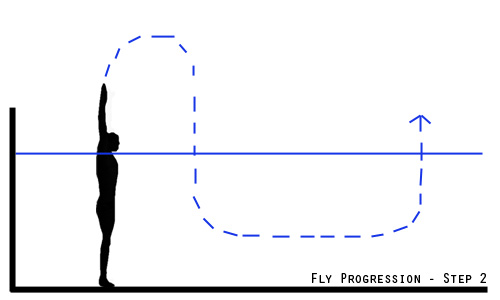
Once they have mastered the rainbow, the next step is to add a glide after entry so that they glide along the bottom for a bit and then come up. Have them straighten out their backs, push out their chests and glide out a bit. You will see swimmers naturally start executing a double arm pull while doing this drill as they come up for air. That is always a good sign. This one must be mastered in such a way that they have a nice high rainbow, and then after entry, they immediately straighten themselves out for the maximum glide. Look to make sure they aren’t inverting their back into an arc going in the other direction. Swimmers who do that will tend to have weak hips when they start doing fly.
Step 3
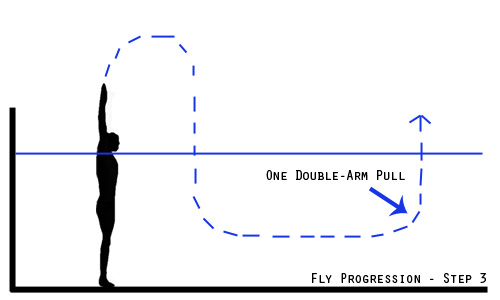
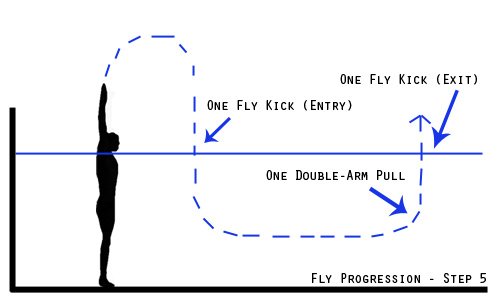
By this point many of the swimmers will have started executing the natural double arm pull on exit. There may still be some that aren’t. For all, point out that it must be done right before they emerge. We describe it as pulling yourself out of the water so that your hands finish the pull at the same time that your head and shoulders break out of the water. So have the swimmers execute the rainbow, then the glide, then the double arm pull just prior to exit. It is important to make sure they are pulling their hands down the center of their body. It is important to make note of the lingo used here as well. At this point I am telling the swimmers, “rainbow to glide to double arm pull.” It is important to start using the key words over and over, so you can say “higher rainbow” or “longer glide” and they can immediately fix it.
Step 4
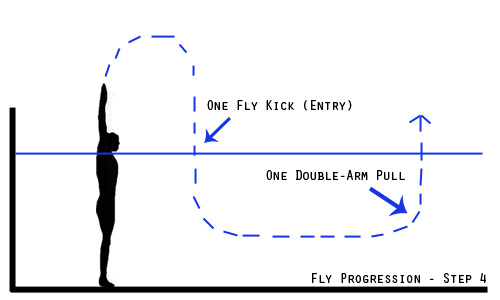
In West Side Fly Progression, we teach two kicks, one at the top of the recovery, or hand entry; and one at the completion of the pull, or hand exit. That’s it, entry and exit. Each swimmer ultimately redefines their entry and exit kick timing, but the basic model is two kicks. One kick is for balance, (the exit kick) and one kick is for power (the entry kick). The exit kick is also a power kick, but as it is the product of residual hip momentum, it does more for body balance than propulsion.
The first kick we teach is the entry kick. It is possible that by this time, the swimmers have already started doing some sort of kick after they complete their rainbow but now is the time to make note of it. We have them execute one fly kick at the completion of their rainbow and as they have just started their glide. It takes some time to get this one right but ultimately you want that kick to come exactly at the moment that their feet are about to go under the water. Most of them will start the kick from the knees, which is fine at this point because we are nowhere near ready for hip training.
Step 5
The last step in this part of the process is adding in the exit kick. Have them execute the second kick just as their heads are about to break the surface and as their hands are just about at their hips. This way they feel the little surge that comes as a result of the kick. Most of the time they try to execute the second kick while still in the glide phase, but we just keep reinforcing the timing until they get it. It is important that with both kicks they are also starting to learn to keep their feet and legs together tightly so that there are no gaps. We use the phrase “one fin;” keep the legs together as one fin.
Once the first progression is completed, and all swimmers are rocking it, it’s time to move to the hips and arms.
Steps 1-5 are part of the same stage, meaning they should be done together, in order. I would recommend doing them every day at least twice through before you begin the remaining stages. It helps to reinforce the concepts and gets their bodies attuned to the motions they will need to perform.
The remaining stages, 2-5, each encompass multiple steps, but each stands alone as a stage and can be done any time without needing to do any of the other stages. Frequently, we will do fly drills that focus on one particular stage and then put it into practice. For the sake of this discussion however, I have put them in order of progression, meaning you should learn stage 2 before you learn stage 3 and so on.
Stage 2 – Kicking
Next to the first stage, the kicking stage is the most critical. There are four kicking steps in this stage. The first thing we teach swimmers is an understanding of how the hips and core play a pivotal role in the fly kick. Discussion revolves around the importance of kick in general, but primarily the fly kick. We use concepts like two legs together equals “one big fin” and “split leg syndrome” which indicates that the swimmer has a distinctive gap from the knees down. There are constant reminders of both, the goal being that the swimmer wants to achieve the “big fin” and maintain it.
Step 6
The first phase is to have the swimmers get into water deep enough for vertical kicking. To understand how the hips drive the feet, we use the image of a diamond. I have them imagine their body being vertical in the center of the diamond:
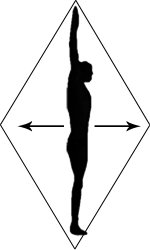
The goal here is to think about keeping the arms at the top of the diamond and the feet at the bottom and only move the hips forwards and backwards trying to touch the side points of the diamond. The terminology I use is “butt out” / “butt in.” The purpose here is to get them to feel how much power their hips generate and send down to their feet. They can put their arms across their chest if it’s easier to do, but the point remains, the top and bottom of the body should NOT move … only the hips. Then I have them shrink the width of the diamond as much as they can and still generate the same amount of power from the hips. What they discover is that as they shrink the width of the diamond, their feet start moving more and more in a whip-like fashion. This is critical because this whip-like motion is what they will need to properly finish their fly kick.
Step 7
After several minutes of having them widen and narrow the diamond in order to see and feel the differences, have them push off the wall on their back with their arms at their sides. They do 25’s of fly kick on their back using ONLY their hips. No deliberate foot movement allowed. The only foot movement allowed is the residual shockwave motion from their hips. At first they don’t move very far or fast, but as they compress the width of the diamond, they find themselves starting to move very fast through the water from the up and down motion of their hips. It’s a pretty important breakthrough moment.
Once we have done several 25’s of this and everyone is moving quickly, the swimmers put their arms above their heads and do the same motion on their backs. This is a very cool time because they have learned to use their hips, and now that their bodies are longer with the arms above the head, they are very fast through the water and their feet are getting a lot of residual compressed energy.
Step 8
The next step is to have them do the arms at the side again, but this time they deliberately move their feet at the end of the shockwave. They are instructed to wait until they feel the power get to the feet and then snap the feet. In the beginning, most usually don’t wait long enough and try to have the knees commit the foot snap. It’s important to have them keep repeating it until they have the power and the patience to send the shockwave from the hips to the foot and snap it off at the right time.
We repeat this with the arms above the head. By now, the swimmer who was, before, taking 50+ seconds to complete a 25 of fly kick, is now taking about 30 seconds. Most of the swimmers, if not all, will start telling you that they feel it in their abs. This is always a good sign. If their abs are burning, it is a guarantee that they are generating the power from their hips and core.
Step 9
What we do next, although it could be considered overkill, is have the swimmers do the vertical fly kicking again, switching back and forth between using their feet at the end of the kick and not using their feet. Ten kicks on, ten kicks off, or a similar pattern is used.
Step 10
The next part of the kick is to have them repeat ALL of the above, but on their stomachs. Snorkels come in real handy at this point, but if you don’t have any, they can just breathe in heads up fashion. Fly kicking on the stomach is slightly more complicated because the tendency is to want to use the knees to snap off the kick instead of using the feet. You have to spend a bit more time on the fly kick on the stomach to ensure that the hips are doing the right thing and that the feet are in the right place. I will have them do several 25’s starting with a very wide diamond so that their hips/butts are going very high up and then pushing down with as much force as they can generate. Over the course of the 25, they compress the diamond a little bit at a time, until they have reached the smallest width they can manage with the highest degree of hip power while still moving forward. They will see the variations in speed as the diamond gets compressed.
Now, here comes the fun part. Starting back at the beginning of Stage 2, with the fly kick on back with arms at the side, I have them put their fins on and do ALL of the above (except the vertical kick) again. This is more of a fun thing for them because they get to go really fast, but it also helps them realize just how much their hips need to be moving to get speed. Fins are useful in many ways and every coach has his or her own philosophy on fins. I only like to use them to highlight deficiencies/efficiencies and very rarely do I use them in a set for work.
It is critical that the kicking is mastered before moving on. I have seen enough beautiful upper body fly with awful kicking in my career. So many swimmers get to the 150 of the 200 and die a painful death because they start going vertical and relying on their knees to do the work. If only they stayed compressed and let their hips do their job, they would have a much easier time. Hips and core … they make all the difference.
Stage 3 – Head Position
There are many schools of thought on proper head position in fly. The general consensus among some of the more elite coaches in the world is that the head should be
a) Relaxed
b) Aligned with the back/body
c) Not involved in the stroke
At West Side we teach relaxed, neutral head position in all strokes, especially fly and breaststroke. Take the head out of the fly and you get away from swimming vertically, which is the condition caused by deliberately lifting the head to breathe as your hands exit the water, thus forcing your hips to drop and you basically start swimming up instead of forward.
No one does the neutral head position in butterfly better than Michael Phelps; Michael's head doesn’t move a single inch in any direction. It stays in the exact same neutral position whether he is breathing or on the recovery portion of his stroke. Essentially he has taken the head out of the stroke. This enables him to stay flat and move forward only, not up.
Step 11 – Finding Neutral
For each swimmer, the neutral position is different. To help your swimmers find out what their neutral positions are, have them take a deep breath and float on their stomachs (or put on a snorkel and float) with arms at sides. (Swimmers who are negatively buoyant can put a pull buoy between their legs while they float). While floating, they should move their chins up and down until they find the head position that feels relaxed with no strain on the neck or shoulders. That is the neutral head position.
Step 12 – Staying Neutral
Now that the fly kick has been mastered in Stage 2, this is an opportune moment to put it to work. Have the swimmers do 25s of fly kick on their stomach, both with their hands at their sides and above their heads in a streamline position. They can use snorkels if they have them, otherwise just have them breathe in heads up fashion. Their goal is to kick 25s and keep their heads in a perfectly neutral position while letting their hips do the kick work. Do these until the swimmers all look relaxed and tell you that they feel relaxed.
The swimmers should be cognizant of exactly where their neutral position is, as should the coach, while they do these 25s. You will need to catch them and remind them hundreds of times as they do more and more fly because it is one of those things that is the first to be forgotten when tiredness sets in. The unfortunate part is that the deliberate head movement only makes swimmers more tired which makes them move their head more, and so on and so forth.
Stage 4 – One-Arm Fly
So now that the head position has been mastered it is time to see if they can actually move an arm, while moving their hips, and keeping the head aligned. That brings us to one-arm fly … the single most incorrectly done drill out there today.
Step 13 – Basic Mistakes
To properly execute the one arm fly, the swimmers should be able to do a 25 fly kick on their stomachs with their heads properly aligned and with a nicely compressed diamond. The one-arm fly is actually a pretty simple drill. The swimmers, with shoulders square to the water and one arm either out on front or at the side, lift an arm from the hip and, keeping it parallel to the water (palms can be down or facing out), move it around to the front and enter the water to initiate the next catch. The sequence is simple … kick, catch, pull, kick, repeat.
Where most swimmers go wrong is in three places. First of all, they do not keep their shoulders square to the water. Typically, the shoulder of the arm not swimming is dropped down in the water so the body is angled off the non-stroke hip (aka the 45-degree position). That leads to the second error, swinging the fly arm over the top (like one arm freestyle). If you don’t swim fly like that, why would you do a fly drill like that? The third place is the kick. Most one-arm fly drillers either tend to kick way too big, resulting in a dramatic up and down motion, or they freestyle kick between fly kicks. Two fly kicks only, legs must stay together and they must be done with the right timing.
One-arm fly drill should be simple, non-dramatic, and most of all, fun. It teaches the swimmers how to time the arms with the hips and kick, and do so while keeping the head aligned. No butterflier can do enough of the one arm fly drill as long as it’s done properly.
Step 14 – Switch Arms
As swimmers start to learn the timing, it is important to switch arms frequently so that they are able to learn the timing for both left and right arms. Typically, one arm will be harder to control than the other. Have each swimmer identify which arm is easier to time and which one is harder, so you know which one to place special emphasis on when you assign this drill.
Let me stress that if you just assign this drill and walk away, there is practically a guarantee that swimmers will do it incorrectly or try and do it too fast. Assign this drill with prejudice and make sure you are watching it get done, even with your experienced swimmers; they are the MOST likely candidates to do this incorrectly.
The swimmers should be sure of proper head alignment with this drill. When breathing, they can either breathe head up or breathe to the side. Use caution if allowing swimmers to breathe to the side, as this typically devolves into the 45-degree position. It is also important that if the swimmers breathe with head up style that they NOT use that same style when switching to normal fly. In order to breathe head up during one arm fly, they will have to deliberately move their heads. Just make sure that when they put it back in the water, it gets back into neutral position.
There are dozens of variations of one-arm fly, but some good ones to do are alternate side, pattern based, like three right arm strokes and then transition to three left arm strokes. The transition stroke is a good opportunity for them to focus on staying square while switching to the opposite side. Furthermore, you can add a full fly stroke, (once they have learned it), in between the three right and three left. Another good one to do is right arm stroke with left arm down at the side and then, after completing the right arm stroke, leave the right arm at hip while recovering the left arm stroke and so on. This forces proper hip timing but is a little more of an advanced drill.
Stage 5 – Putting it All Together
The final stage is to try and put it all together. They have learned how the body is supposed to move. They have learned timing. They have learned what their hips are supposed to do and how the kick should feel. They know where their head should be at all times, and they know what to do with their arms. The hard work is done, right? Not so fast.
Even if your swimmers have perfected all of the above, they may get to the part where you say, “Okay now lets do some real fly,” and when they start using two arms they look like they are being attacked by a swarm of bees. Don’t fret. Figure out which part is giving them trouble and go back to that stage and revisit it. Then have them try it again. One of the best parts about this progression is that you can go back to any one stage and do it some more, and then try the two-arm fly again. From my experience, when doing the full fly progression for a group of swimmers, we have an immediate 80% graduation rate. The other 20% may take an extra day or two because when they get to the two-arm fly, they forget their hips or they forget the head positioning.
There is an old adage that goes something like, “If you learn something and do it right the first time, you have learned one thing. If you learn something and it takes you 100 times to get it right, you have learned 100 things.” Swimmers have to become aware of their bodies in fly and understand how the power comes from their center, the core and hips, and how the arms and legs each serve special roles. They have to understand that the head is like a designated driver. It wants to party but it can’t.
There are additional fly drills that I find useful for swimmers who make it to the world of two-arm fly and survive. We do a drill called the Biondi Drill, which goes something like this: Swimmers leave the wall, streamline properly and take their breakout stroke. Immediately after their hands get to their hips at the completion of the pull, they reverse the full motion of the pull underwater, back to the starting catch position. Then they pull down again and recover the arms for the next stroke. The Biondi Drill is awesome for catch positioning, pull and hip timing. There are even variations to the Biondi Drill such as what we call Biondi +1 or Biondi +2 and so on. Whenever I put a number after it that just means that you do the underwater pull an additional one or two times … and so on. Naturally, we give credit to Matt Biondi for that drill, since it’s his!
Another fly drill is butterfly with additional kicks. Swimmers take a butterfly stroke, and then do three, four or five fly kicks. The goal here is to interrupt their timing and see if they can catch the timing back off of the last kick. It really forces the swimmers to be aware of when to pull/catch without the aid of an entry kick. It’s basically the same as doing a breakout stroke over and over again down the length of the pool.
Good luck with your fly progression!
Categories:
- Technique and Training
- Coaches Only
About the Author
Nate McBride
Related Articles


